|
WinFlex Web Page Help
This page offers help on the following:
- Basics
- Cases
- Agents and Broker/Dealers
- Groups
- Popular Features
- Miscellaneous
WinFlex Web Basics
Starting WinFlex Web
To Start using
WinFlex Web, click the
[Start WinFlex Web]
button. You may also check the “Open Last-Used Case” box to automatically open the
last case you edited.
NOTE: First time users will be detected and the Java plug-in needed for WinFlex
Web will download automatically*. This one-time step will take 10-15 minutes depending
on the speed of your Internet Connection.
Changing your Password
1)
Click on the Profile option under the MANAGE menu on the left.
2) On the page, click on
| Password |
3) Enter your old password in the "Password"
field.
4) Enter your new password in the "New Password"
field and re-enter your new password in the "Confirm
New Password” field.
NOTE: Your password is CASE SENSITIVE and must be at least
6 characters.
5) Click the
[Change] button to save your new password.
Adding Companies to your Profile
1)
Once you have logged into WinFlex Web, click on the Profile option under
the MANAGE menu on the left.
2) Click on the | Add Companies |
option.
3) In the Available Companies section,
select the WinFlex Web companies you would like access to by clicking the checkbox
next the company name and enter the agent code for the selected company (if applicable).
4) Click the
Place Request link on the right hand side.
NOTE: You will be notified via email when the company has
responded to your request.
If you would like to see more companies offer
their products in WinFlex Web, let them know! See Request a
Carrier on how to do it.
Adding Agencies to your Profile
1)
Once you have logged into WinFlex Web, click on the Profile option under
the MANAGE menu on the left.
2) If you are not yet part of an agency
in WinFlex Web, you will see an | Add
Agency | option to the right of the
| Add Companies |
option.
3) If you belong to an Agency or BGA in
the list below, select that organization in the section below.
4) Click the
Request Agency Access button at the bottom.
5) Once you click on the
Request Agency Access
button, the | Add Agency | option will be removed from the top menu while pending for
agency approval as well as once you are approved. If you are denied, you will see
the | Add Agency | option again.
NOTE: You will be notified via email when the
agency has responded to your request.
If you would like to search for an agency, type in the words
you would like to search for, then click the
Find button to the right.
Changing your Profile Information
1)
Click on the Profile option under the MANAGE menu on the left.
2) On the page, click on
| Update Info |
3) Enter updated any information.
4) Click the
[Save Profile] button to save your changes.
Notifying Non-Participating Carriers of your interest in WinFlex Web
If you would like
to notify carriers of your interest in seeing their products in WinFlex Web, you
may use the Request Carriers page. NOTE: To request access to participating WinFlex
Web carriers, see Adding Companies to your Profile.
Instructions:
1) Click on the Request a Carrier
option on the left.
2) Select the carriers you would like
to notify by clicking the checkbox next the company name.
3) Enter your information in the area
below.
4) Click the
[Submit Request] button.
The selected carriers will be notified via email of your
interest in illustrating their products in the web version of WinFlex.
Integrating to VitalSigns from WinFlex Web
WinFlex Web users who have VitalSales Suite accounts can now include VitalSigns
reports in their WinFlex Web illustrations. To activate the VitalSigns reports,
you must link your WinFlex Web Account to your VitalSales Suite Account. To link
your accounts, please complete the following steps:
1. Login to WinFlex Web.
2. Click on the Integrate VitalSigns link under the
Tools menu on the left.
3. Select your method of access to
VitalSigns. The options are: “A BGA, MGA or Carrier website”, “VitalSales Suite
account” or “I don’t know”.
4. If you select BGA, MGA or Carrier Website, you will
be given a WinFlex Integration Key. Once you receive your Integration Key, complete
these steps:
a. Open VitalSigns through your usual method
b. In VitalSigns go to the Home menu and click on “WinFlex
Integration”.
c. Enter the WinFlex Integration Key you have written down into the box provided
and click the [Integrate]
button.
d. Once these steps are completed successfully, your WinFlex Web and VitalSales
Suite VitalSigns accounts will be integrated. To run a VitalSigns report, click
the [Start WinFlex Web]
button on the Home Page. Select the company
and product you would like to illustrate, enter the client data, and select the
desired report from the VitalSigns tab (located in the bottom right-hand corner
of the input area).
5. If you select VitalSales Suite Account, you will be
taken to an Integrate VitalSales Suite VitalSigns login page. Enter your VitalSigns Username and Password
and click [Integrate].
Your WinFlex Web and VitalSales Suite VitalSigns accounts will now be integrated.
To run a VitalSigns report, click the [Start
WinFlex Web] button on the Home
Page. Select the company and product you would like to illustrate, enter
the client data, and select the desired report from the VitalSigns tab (located
in the bottom right-hand corner of the input area).
6. If you selected I don’t know you will be given a WinFlex
Integration Key. Once you receive your Integration Key, complete these steps:
a. Open VitalSigns through your usual method
b. In VitalSigns go to the Home menu and click on “WinFlex
Integration”.
c. Enter the WinFlex Integration Key you have written down into the box provided
and click the [Integrate] button.
d. Once these steps are completed successfully, your WinFlex Web and VitalSales
Suite VitalSigns accounts will be integrated. To run a VitalSigns report, click
the [Start WinFlex Web]
button on the Home Page. Select the company
and product you would like to illustrate, enter the client data, and select the
desired report from the VitalSigns tab (located in the bottom right-hand corner
of the input area).
Logging out of WinFlex Web
When using WinFlex Web there will be two browser windows
open. One will contain links to the WinFlex Web Admin pages and the other will contain
the WinFlex Web application. In order to exit WinFlex Web, you need to exit both
browser windows to close the application.
1) Click on the [Save & Exit]
button on the toolbar. This will save your current case and close the application
and its browser window.
2) From the WinFlex Web Admin pages, in
the navigation bar on the left, click Logout. You will be brought back to
the WinFlex Web Login page.
3 Close the Admin page browser window.
Using the Feedback Form
The Feedback Form can be used for giving us feedback (good
or bad) on anything that pertains to the WinFlex system.
You can access the Feedback form with or without logging
into WinFlex Web. If you do log into WinFlex Web, you will not need to fill out
your contact info at the end.
1) Go to the
WinFlex Web Home Page and if you are a WinFlex Web user, log in and then click
on the Feedback option under the GENERAL INFO menu on the left. If
you are not a WinFlex Web user, then just click on the Feedback option under
the GENERAL INFO menu on the left.
2) Select what kind of feedback you would
like to give from the drop down menu, then click Submit.
3) Go through the form by filling out
the product you would like to give feedback on, the subject of your feedback, and
possibly the carrier the feedback pertains to. Then after you have finished filling
out your question(s) or suggestion(s), select the best way for us to contact you
from the drop down menu and then click Submit.
4) Finally, if you did not log into fill
in your contact info in the last page and click Submit.
Managing Cases
Uploading a Case:
1) Click on the Cases option under
the MANAGE menu on the left.
NOTE: You will not see any Saved Cases until you upload
some cases from your desktop or create and save cases using WinFlex Web.
2) Type the full path and case name including
extension in the Upload Case box.
Ex. C:\WinFlex6\Cases\My Case.wfc OR you can click the
[Browse...] button to locate your WinFlex Cases.
3) Click the [Upload] button to
save the case under WinFlex Web.

Case requirements for Uploading:
-
Must be a valid WinFlex case file (.WFC)
-
Must contain 100 clients or less
-
Only 1 case can be uploaded at a time
NOTE: If you upload a case
with the same name as one that already exists in your WinFlex Web cases, the characters
"_wf#" will be added to the end of the case name. (For example: Sample
Case_wf1, Sample Case_wf2)
Downloading a Case:
1) Click on the Cases option under
the MANAGE menu on the left.
2) Select the case to download by clicking
in the box on the left of the list.
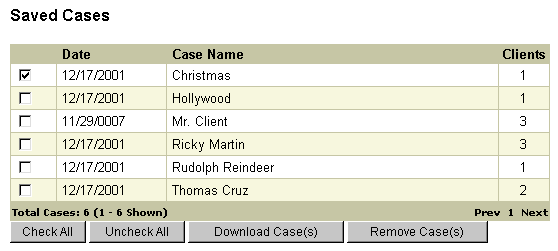
3) Click
the [Download Case] button
4) When the File Download dialog box opens,
choose Save this file to disk.
5) The case name will be entered for you.
You must choose where to save the case; the default desktop location for cases is
C:\WinFlex6\Cases. If you don't know where your cases are saved, start WinFlex on
your desktop the case name and path appear in the title bar in the top left of the
screen.
Tips for Downloading Cases:
If you are an Internet Explorer user
click here to go to the Microsoft site for an automated update. Browser versions
that are affected by this problem are: Internet Explorer 5.5 with Service pack 1.
For a summary of the issue on the Microsoft site,
click here.
If you cannot obtain the update automatically due to some
system settings, you may be able to download it directly from this page:
http://download.microsoft.com/download/ie55sp1/secpac19/5.5_SP1/WIN98Me/EN-US/q299618.exe
If you are unable to update your system, follow these instructions
to download WinFlex Case files:
1) From the My Cases page click
in the check box next to the case you wish to download.

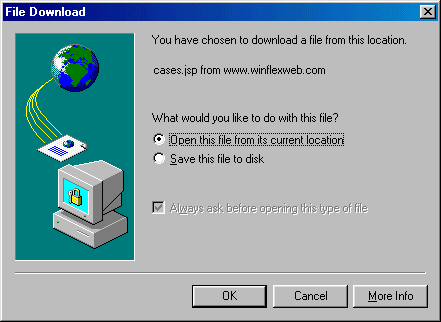
2) When the
File Download window opens, click on Open this file from its current location.
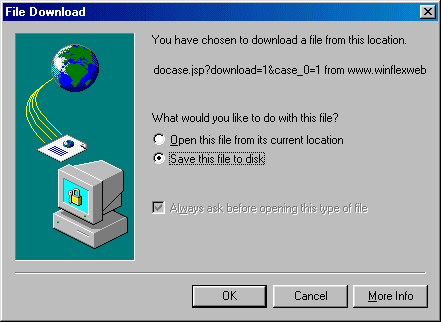
3) To save this
case choose Save the file to disk.
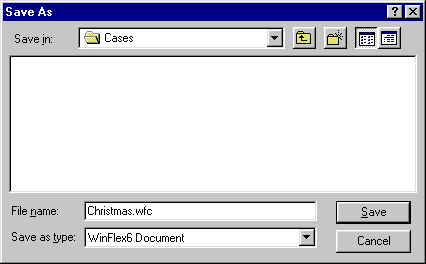
4) The case name
will be entered for you. You must choose where to save the case; the default desktop
location for cases is C:\WinFlex6\Cases. If you don't know where your cases are
saved, start WinFlex on your desktop the case name and path appear in the title
bar in the top left of the screen.
Removing a Case
1) Click on the Cases option under
the MANAGE menu on the left.
2) Select the case you wish to remove
by clicking in the check box in the left column.
3) Click Remove Case.
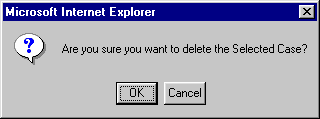
4) A box will appear asking you to confirm
case deletion.
Emailing a Case
1) Click on the Cases option under
the MANAGE menu on the left.
2) Select the case you wish to email by
clicking in the check box in the left column.
3) Click Email Case. An email dialog
will appear.
4) Enter the recipients email address
or WinFlex Web user name. You may also enter a message for the recipient.
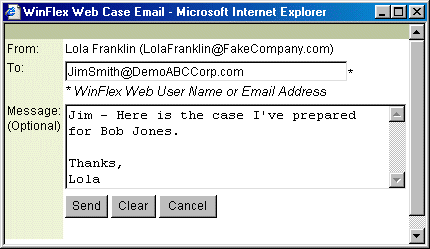
5) If the user name or email address entered is valid, a message
will appear indicating that the case was sent successfully. If there is a problem
sending the case, a message will appear indicating that an error occurred. If you
receive an error, double check the email address or user name entered.
Adding a Case to a Group:
Before you can add a case to a Group, you must first create
or join a Group. Click here to learn more about creating a Group.
Adding a case to a group will allow you to share the case
with other Group members. All Group members will have access to all cases in the
Group. A case may only be shared with one Group at a time. If you need to share
a case with another Group, you will need to use the
Save As option in the WinFlex Web application.
1) From the Cases page click in
the check box next to the case you would like to share with a Group.
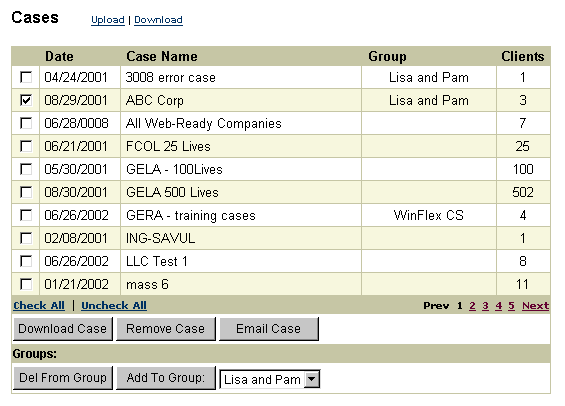
2) Choose the Group
from the Group drop-down.
3) Click the [Add to Group]
button.
4) A confirmation message appears at the bottom of the case list.
MESSAGE THAT APPEARS:

Removing a Case from a Group
Removing a case from a Group will re-assign the case to
the original owner. If you are not the original owner, then the case will no longer
appear on your case list.
1) From the Cases page click in
the check box next to the case you would like to remove from the Group.

2) Click the
[Del from Group] button.
3) You will be asked to confirm the delete, click OK.
4) A confirmation message appears at the bottom of the case list.
MESSAGE THAT APPEARS:

Deleting a Group Case
To delete a case that belongs to a Group, you must first
remove the case from the Group then delete the case.
1) From the Cases page click in
the check box next to the case you would like to remove from the Group.

2) Click the
[Del from Group] button.
3) You will be asked to confirm the delete, click OK.
4) A confirmation message appears at the bottom of the case list.
5) Check the case you would like to delete from your list.
6) Click the [Remove Case]
button.
MESSAGE THAT APPEARS:

NOTE: If you forget to delete the
case from the assigned Group first, you will receive a message indicating that the
case was not removed.
MESSAGE THAT APPEARS:

Managing Agents and Broker/Dealers
Uploading Agents:
1) Click on the Agents option under
the MANAGE menu on the left.
NOTE: You will not see any Saved Agents until you upload
some Agents from your desktop or create and save them using WinFlex Web.
2) Type
the full path and name of your agents file including extension in the Upload Case
box.
Ex. C:\WinFlex6\agents.ini OR you can click the
[Browse] button to locate your WinFlex agents.
NOTE: The agents file on the desktop is agents.ini by default.
However, if you have entered over 150 agents you could have multiple files. The
additional files will be named in this manner: agents1.ini, agents2.ini, etc. Each
of these files needs to be uploaded individually.
3) Click
the [Upload] button to save all of your agents under WinFlex Web.

Uploading Broker/Dealers:
1) Click on the Broker option under
the MANAGE menu on the left.
NOTE: You will not see any Saved Broker/Dealers until you
upload Broker/Dealers from your desktop or create and save them using WinFlex Web.
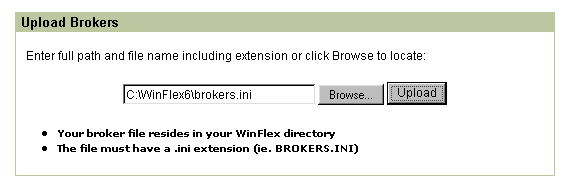
2) Type
the full path and name of your Broker/Dealers file including extension in the Upload
Case box.
Ex. C:\WinFlex6\brokers.ini OR you can click the
[Browse] button to locate your WinFlex Broker/Dealers file.
NOTE: The Broker/Dealers file on the desktop is brokers.ini
by default. However, if you have entered over 150 Broker/Dealers, you could have
multiple files. The additional files will be named in this manner: brokers1.ini,
brokers2.ini, etc. Each of these files needs to be uploaded individually.
3) Click
the [Upload] button to save all of your Broker/Dealers under WinFlex Web.
Adding Agents:
1) Click on the Agents option under
the MANAGE menu on the left.
NOTE: You will not see any Saved Agents until you upload
some Agents from your desktop or create and save them using WinFlex Web.
2) Click
on the [Add Agent] button.

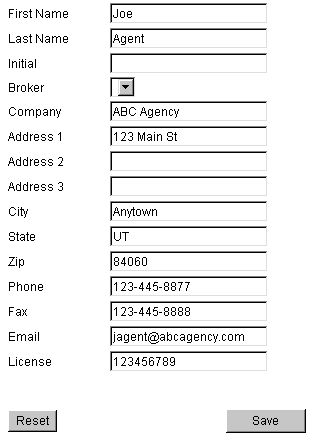
3) Enter
the Agent information and click the [Save Agent] button.
Editing Agents:
1) Click on the Agents option under
the MANAGE menu on the left.
2) Click on the word "Edit"
in the last column and the Agent information form will open with the Agent information
loaded.
3) Make any changes and click the [Save
Agent] button.
Removing Agents:
1) Click on the Agents option under
the MANAGE menu on the left.
2) Select the Agent you wish to remove
by clicking in the check box in the left column.
3) Click Remove Agents.

Setting a Default Agent:
To use a Default Agent in WinFlex Web you must complete
the following:
1) Add an Agent using the WinFlex Web
MANAGE Agents page.
2) Start the WinFlex Web application by
clicking the Start WinFlex Web option under the Home section on the
navigation bar on the left.
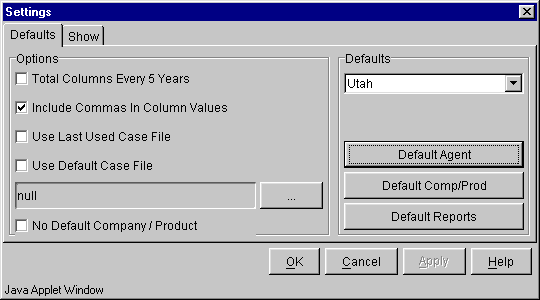
3) Choose the Options menu, then
Settings.
4) Click on the [Default Agent]
button.
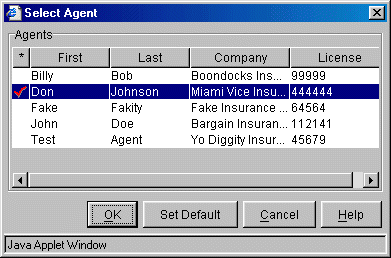
5) Highlight the Agent you wish to set
as your Default Agent and click the [Set Default] button.
Adding an Agent to a Group:
Before you can add an agent to a Group, you must first create
or join a Group. Click here to learn more about creating a Group.
Adding an agent to a group will allow you to share the agent
with other Group members. All group members will have access to all agents in the
group. An agent may only be shared with one group at a time. If you need access
to an agent in multiple groups, you may add another agent record and share it with
the other group.
1) From the Agents page click in
the check box next to the agent you would like to share with a Group.
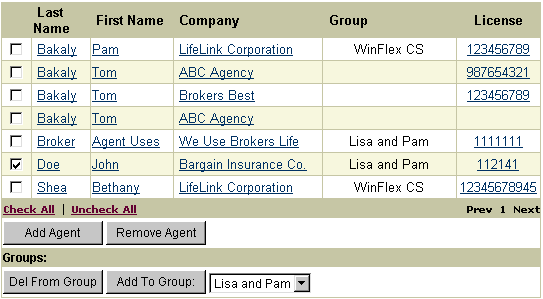
2) Choose the Group
from the Group drop-down.
3) Click the [Add to Group]
button.
4) A confirmation message appears at the bottom of the agent list.
MESSAGE THAT APPEARS:

Removing an Agent from a Group
Removing an agent from a Group will re-assign the agent
to the original owner. If you are not the original owner, the agent will no longer
appear on your case list.
1) From the Agents page click in
the check box next to the agent you would like to remove from the Group.

2) Click the
[Del from Group] button.
3) You will be asked to confirm the delete, click OK.
4) A confirmation message appears at the bottom of the agent list.
MESSAGE THAT APPEARS:

Deleting a Group Agent
To delete an agent that belongs to a Group, you must first
remove the agent from the Group then delete the agent.
1) From the Agents page click in
the check box next to the agent you would like to remove from the Group.

2) Click the
[Del from Group] button.
3) You will be asked to confirm the delete, click OK.
4) A confirmation message appears at the bottom of the agent list.
5) Check the agent you would like to delete from your list.
6) Click the [Remove Agent]
button.
MESSAGE THAT APPEARS:
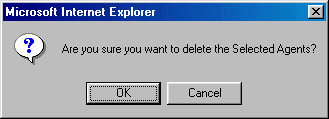
NOTE: If you forget to delete the
agent from the assigned Group first, you will receive a message indicating that
the agent was not removed.
MESSAGE THAT APPEARS:

Adding Broker/Dealers:
1) Click on the Agents option under
the MANAGE menu on the left and then click on the "Manage Brokers/Dealers"
link in the upper right hand corner.
NOTE: You will not see any Saved Broker/Dealers until you
upload Broker/Dealers from your desktop or create and save them using WinFlex Web.
2) Click on the
[Add Broker] button.
3) Enter the Broker information and click the [Save Broker]
button.
Editing Broker/Dealers:
1) Click on the Agents option under
the MANAGE menu on the left and then click on the "Manage Brokers/Dealers"
link in the upper right hand corner.

2) Click on any item of the Broker you
wish to edit and the Broker information form will open with the current Broker information.
3) Make
any changes and click the [Save] button.
Removing Broker/Dealers:
1) Click on the Agents option under
the MANAGE menu on the left and then click on the "Manage Brokers/Dealers"
link in the upper right hand corner.
2) Select the Broker you wish to remove
by clicking in the check box in the left column.
3) Click [Remove Broker].

Managing Groups
What is a WinFlex Web Group?
In WinFlex Web a Group is used to share work like Cases
and Agents. Using Groups can save you time by entering Agent information one time
and sharing with the Group. In a call center or office, sharing cases within a Group
allows you to answer anyone's calls about cases.
Who should use a Group?
WinFlex Web users who have a need to share Cases and/or
Agents should create a Group and add the cases and agents that are needed.
What else is helpful when using Groups?
Using a naming convention for cases that allows other people
to find your work is recommended. You may want to use the Client's first and last
name in the case name to help you locate a case in a list.
Ex: Smith Robert.wfc
or Robert Smith.wfc
Viewing Groups I belong to (My Groups)
1) Click on the Group option
under the MANAGE menu on the left.
NOTE: You will not see any Groups in | My Groups |
until you belong to at least one group.
2) Click on the | My Groups |
view (this view should automatically be displayed when first accessing the
Manage Group
pages).
There are three columns displayed: "Group Name",
"Group Description", and "# of Members" in the group.

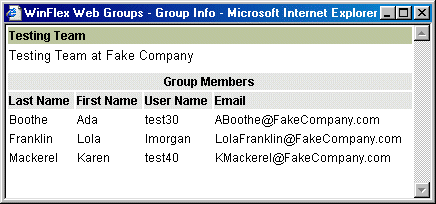
3) To view the
members in your groups, click on the underlined group name under the "Group
Name" column. A window will appear that lists the Group name, description,
and member information for that group.
Creating a Group
1) Click on the Group option
under the MANAGE menu on the left.
NOTE: You will not see any Groups in | My Groups |
until you belong to at least one group.
2) Click on the | Create Group |
option.
There are two columns displayed: "My Group List"
and "Create Group".
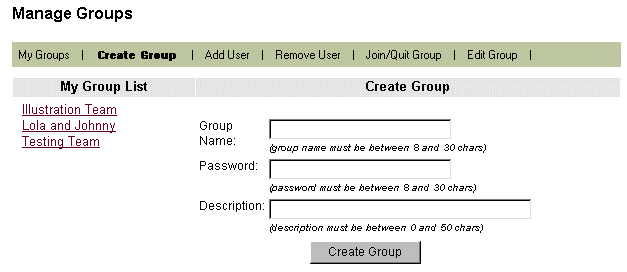
NOTE: To view the members in your
groups and group description, you may click on the underlined Group name under "My
Group List" at any time. A window will appear that lists the Group name, description,
and member information for that group.
3) Under the "Create Group" column, enter the information
required to create a new group:
- Group Name - Enter a group name that is descriptive and meaningful to
you and the other users that will be joining your group. The group name must be
between 8 and 30 characters.
- Password
- Enter a password for this group. If you invite others to join this group, you
will need to provide them with this password. The password must be between 8 and
30 characters.
- Description - Enter a description of the group in this field. This will
allow other group members to easily identify the purpose of the group. The description
must be between 0 and 50 characters.
4) Click
on the [Create
Group] button.
If the group is created successfully, the group name will
be added under the "My Group List" column.
NOTE: If the group name you entered already exists within
the WinFlex Web system, a message will appear at the top of the page.
If the password or description does not meet the character
length requirements, a dialog box will appear indicating the problem.
Adding a WinFlex Web User to a Group
1) Click on the Group option
under the MANAGE menu on the left.
NOTE: You will not see any Groups in | My Groups |
until you belong to at least one group.
2) Click on the | Add User |
option.
There are two columns displayed: "My Group List"
and "Add User".
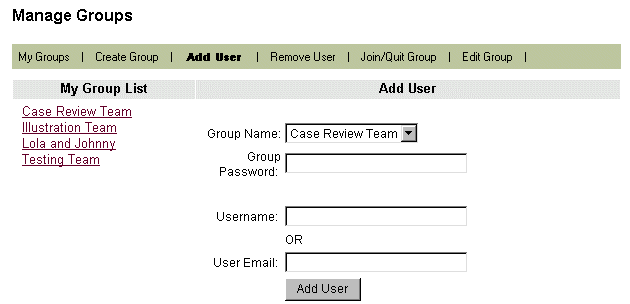
NOTE: To view the members in your
groups and group description, you may click on the underlined Group name under "My
Group List" at any time. A window will appear that lists the Group name, description,
and member information for that group.
3) Under the "Add User" column, enter the information
required to add a user:
- Group Name - Select the group you want to add users to.
- Password
- Enter the password for the group you selected.
- User Name
- If known, enter the WinFlex Web username of the person you would like to add to
the group. Username or User Email address must be entered.
- User Email - If known, enter the full email address of the person you
would like to add to the group (ex: bobjones@fakecompany.com). Username or User
Email address must be entered.
4) Click
on the [Add
User] button.
If the user was added to the group successfully, a message
will appear below the [Add User] button.
NOTE: If the user name, user email address, or group password
entered is invalid, a message will appear at the top of the page.
Removing a WinFlex Web User from a Group
1) Click on the Group option
under the MANAGE menu on the left.
NOTE: You will not see any Groups in | My Groups |
until you belong to at least one group.
2) Click on the | Remove User |
option.
There are three sections displayed: "My Group List",
"Select Group", and "Remove Users".
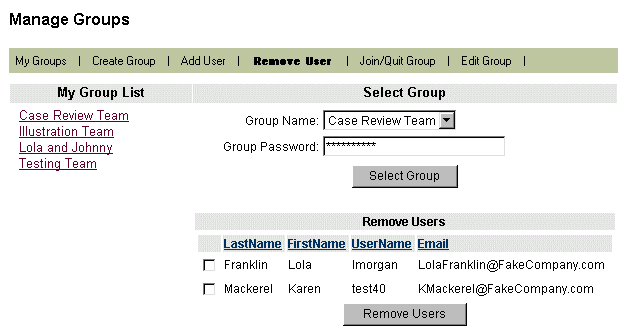
NOTE: To view the members in your
groups and group description, you may click on the underlined Group name under "My
Group List" at any time. A window will appear that lists the Group name, description,
and member information for that group.
3) Under the "Select Group" section, enter the group
information required to remove a user:
- Group Name - Select the group to remove the user from
- Password
- Enter the password for the group you selected.
4) Click
on the [Select
Group] button.
The list of users in the selected group will appear under the "Remove Users"
section.
NOTE: If the group password entered is invalid, a message
will appear at the top of the page.
5) Click in the check box next to the
user(s) you would like to remove from the Group. You may sort the list of users
by clicking on any of the table column headers (Last Name, First Name, User Name,
or Email).
6) Click the
[Remove Users] button.
If the user(s) were successfully removed from the group,
they will no longer appear in the user list under the "Remove Users" section.
Joining a Group
1) Click on the Group option
under the MANAGE menu on the left.
NOTE: You will not see any Groups in | My Groups |
until you belong to at least one group.
2) Click on the | Join/Quit Group |
option.
There are three sections displayed: "My Group List",
"Join Group", and "Quit Group".
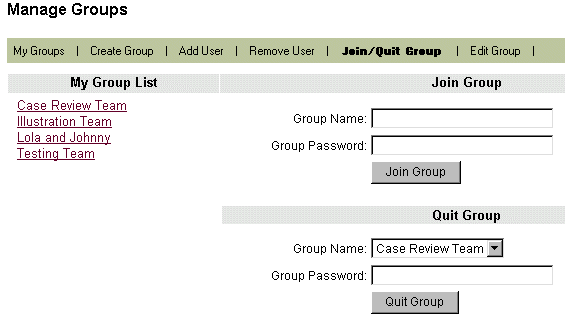
NOTE: To view the members in your
groups and group description, you may click on the underlined Group name under "My
Group List" at any time. A window will appear that lists the Group name, description,
and member information for that group.
3) Under the "Join Group" section, enter the group information
required to join a group:
- Group Name - Enter the group name you would like to join. Another group
member should have provided this information to you. The group name entered is case
sensitive and all punctuation must match.
- Password
- Enter the password for the group you entered.
4) Click
on the [Join
Group] button.
If you successfully joined the group, the group name will appear under the "My
Group List" column.
NOTE: If the group name or group password entered is invalid,
a message will appear at the top of the page.
Quitting a Group
1) Click on the Group option
under the MANAGE menu on the left.
NOTE: You will not see any Groups in | My Groups |
until you belong to at least one group.
2) Click on the | Join/Quit Group |
option.
There are three sections displayed: "My Group List",
"Join Group", and "Quit Group".

NOTE: To view the members in your
groups and group description, you may click on the underlined Group name under "My
Group List" at any time. A window will appear that lists the Group name, description,
and member information for that group.
3) Under the "Quit Group" section, enter the group information
required to quit a group:
- Group Name - Select the group name you would like to quit.
- Password
- Enter the password for the group you entered.
4) Click
on the [Quit
Group] button.
If you successfully left the group, the group name will no longer appear under the
"My Group List" column.
NOTE: If the group name or group password entered is invalid,
a message will appear at the top of the page.
Editing Group Information (Name, Description, and Password)
1) Click on the Group option
under the MANAGE menu on the left.
NOTE: You will not see any Groups in | My Groups |
until you belong to at least one group.
2) Click on the | Edit Group |
option.
There are two columns displayed: "My Group List"
and "Select Group to Edit"
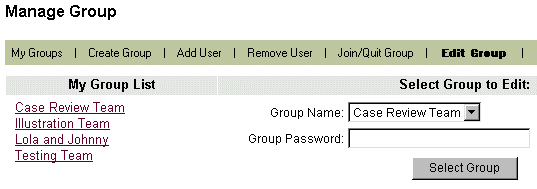
NOTE: To view the members in your
groups and group description, you may click on the underlined Group name under "My
Group List" at any time. A window will appear that lists the Group name, description,
and member information for that group.
3) Under the "Select Group to Edit" section, enter the
group information required to edit a group:
- Group Name - Select the group you would like to edit.
- Password
- Enter the password for the group you selected.
4) Click
on the [Select
Group] button.
NOTE: If the group name or group password entered is invalid, a message will appear
at the top of the page.
If the group password is correct, the "Edit Group"
section will appear below the [Select
Group] button.
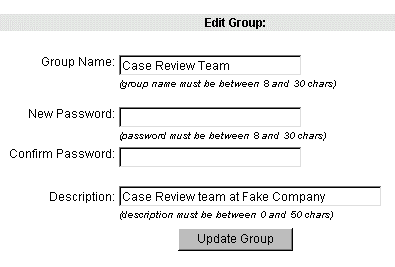
5) The following
fields can be changed on a group:
- Group Name - If you would like to change the group name, you may enter
the new group name here. Note, however, that the group name you select may already
exist in WinFlex Web system. If you do not have a change to the Group Name, leave
this field as is. Group name must be between 8 and 30 characters.
- New Password - If you would like to change the group password, enter the
new password in this field. Password must be between 8 and 30 characters.
- Confirm Password - If you are changing the group password, retype the new password
here.
- Description - If you would like to change the group description, change
the description of the group in this field. The description must be between 0 and
50 characters.
If the group information
was updated successfully, a message will appear below the [Select Group] button.
NOTE: If the group name, passwords, or description entered
is invalid, a message will appear at the top of the page.
Popular Features
Running a Comparison Report (MultiPlan):
1) Launch the WinFlex Web application
by clicking on the [Start WinFlex Web] button on the Home page
2) To find companies that support MultiPlan,
click on the [Product Selector] button then click the
"Comparison" checkbox. The available
product list will be filtered to show all products that allow the Comparison report.

3)
Select a Company and Product from the list
and click [OK].
4) Also
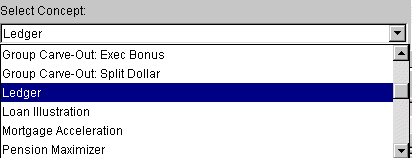
select a concept from the Concept drop-down
list. TIP: For a simple illustration, select "Cash Flow" or "Ledger."
5) Then
enter the insured and policy information
for the first product to be used in the comparison.
6) Next, add additional clients by clicking
on the “Add Clients” button
 on the toolbar or by selecting "Add" from the Client
menu. on the toolbar or by selecting "Add" from the Client
menu.
7) Click on Client 2 and
choose another Company or Product. Do the same for Clients 3 and 4.
8) Now click on the "Run Comparison"
button
 . All clients are submitted for calculation at once. Once
the calculation is completed, you will be able to view the basic illustration for
each client and the MultiPlan comparison report that includes the selected clients. . All clients are submitted for calculation at once. Once
the calculation is completed, you will be able to view the basic illustration for
each client and the MultiPlan comparison report that includes the selected clients.
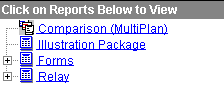
9) The completed MultiPlan report is available
on the WinFlex report tree. To view the report, click on the "Comparison (MultiPlan)"
link. The report will appear in the Adobe Acrobat Reader window.
Running a Composite report:
1) Launch the WinFlex Web application
by clicking on the [Start WinFlex Web] button on the Home page
2) To find companies that support Composite,
click on the [Product Selector] button then click the
"Composite" checkbox. The available
product list will be filtered to show all products that allow the Composite report.
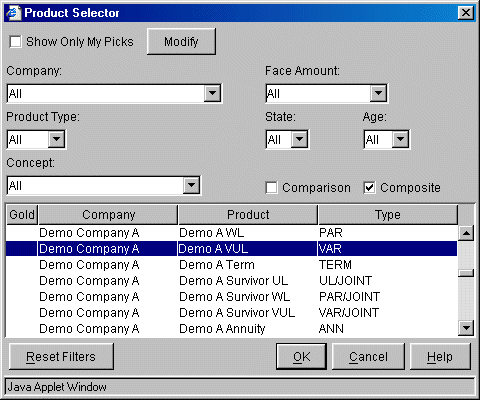
3)
Select a Company and Product from the list
and click [OK].
4) Also
select a concept from the Concept drop-down
list. TIP: For a simple illustration, select "Cash Flow" or "Ledger."
NOTE: You must use the same concept for all clients when illustrating Composite.

5) Then
enter the insured and policy information
for the first client in the group.
6) Next, add additional clients by clicking
on the “Add Clients” button
 on the toolbar or by selecting "Add" from the Client
menu. on the toolbar or by selecting "Add" from the Client
menu.
7) Click on Client 2 and
choose another Company or Product if necessary. Also change any necessary client and policy
information. Do the same for Clients 3 and 4.
8) Now click on the "Run Composite"
button
 . All clients are submitted for calculation at once. Once
the calculation is completed, you will be able to view the basic illustration for
each client and the Composite report that includes the selected clients. . All clients are submitted for calculation at once. Once
the calculation is completed, you will be able to view the basic illustration for
each client and the Composite report that includes the selected clients.
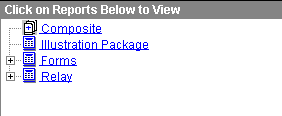
9) The completed Composite report is available
on the WinFlex report tree. To view the report, click on the "Composite"
link. The report will appear in the Adobe Acrobat Reader window.
Session Timeout Tips
To avoid time-outs in the applet, perform one of the following
procedures every 30 minutes:
1) Run an illustration
2) Change a product
3) Save your case
4) Open a new/existing case
Note: Changing the answer to a question will not
refresh your active time in the Applet. For example, switching the sex from Male
to Female will not work.
|


